Quickstart
TBSBIEM is written in Fortran Language. The current version of code is tested in Debian based Ubuntu operating system. Hence, we stick our documentation how to use the code in Debian based Linux operating systems like Ubuntu. Code requires following prerequisites to compile and execute it smoothly.
Prerequisites
The following dependencies are required for TBSBIEM:
OpenMP
NVIDIA HPCSDK module
CUDA toolkit
OpenMP Installation
For any information on OpenMP installation and usage, one can look into following website: https://www.openmp.org
However, for the sake of completeness of documentation, we provide simple steps for installation of OpenMP in Debian based Linux operating systems.
To install OpenMP, follow this step-by-step guide. OpenMP is provided through the GCC compiler, and its runtime library (libomp).
Before installing any software, update the package list to ensure all software is current:
sudo apt update
sudo apt upgrade
Install GCC, which includes basic OpenMP support. For the latest OpenMP features, also install the libomp-dev package:
sudo apt install gcc g++ gfortran
sudo apt install libomp-dev
Check if OpenMP is supported in your GCC compiler by running:
echo | cpp -fopenmp -dM | grep -i open
To control the number of threads that OpenMP will use at runtime, use the following command:
export OMP_NUM_THREADS=4
The -fopenmp flag enables OpenMP parallelization.
NVIDIA HPCSDK and CUDA Toolkit Installation
The TBSBIEM code is tested using the nvfortran compiler and GPU acceleration is acheived using OpenACC directives. To enable nvcc compiler support, install the NVIDIA HPCSDK and CUDA toolkit provides the environment for building GPU-accelerated applications.
The following webpage has installation and usage instructions for NVIDIA HPCSDK: https://docs.nvidia.com/hpc-sdk/hpc-sdk-install-guide/index.html
The following webpage has installation instructions for CUDA toolkit: https://www.cherryservers.com/blog/install-cuda-ubuntu
We have documented simple steps to the install the NVIDIA HPCSDK and CUDA toolkit in Debian based Linux operating systems.
NVIDIA HPCSDK
Install or update NVIDIA dirvers first. One can use following webpage for the reference: https://www.server-world.info/en/note?os=Ubuntu_24.04&p=nvidia&f=1
Download the latest tar file installer from the NVIDIA HPCSDK website suitable for Linux x86_64 or ARM architectures from the following webpage: https://developer.nvidia.com/hpc-sdk-downloads
Open a terminal and extract the downloaded package:
tar xpfz <tarfile>.tar.gz
Navigate into the extracted directory and start the installation:
cd <tarfile>
sudo ./install
Choose installation location (default is /opt/nvidia/hpc_sdk) and type of installation (single system or network):
export NVHPC_SILENT=true
export NVHPC_INSTALL_DIR=/opt/nvidia/hpc_sdk
export NVHPC_INSTALL_TYPE=single
sudo ./install
After installation, set up environment variables in your shell configuration file (e.g., ~/.bashrc):
export PATH=/opt/nvidia/hpc_sdk/Linux_x86_64/<version>/compilers/bin:$PATH
export MANPATH=/opt/nvidia/hpc_sdk/Linux_x86_64/<version>/compilers/man:$MANPATH
Replace <version> with the installed version directory
CUDA toolkit
Here are the steps to install the CUDA toolkit.
Update the system and install essential packages:
sudo apt update
sudo apt install build-essential dkms
Download an appropriate OS and local or network version of CUDA Toolkit installer from following website. https://developer.nvidia.com/cuda-downloads.
One can use the apt method. For Ubuntu 22.04, as follows:
wget https://developer.download.nvidia.com/compute/cuda/repos/ubuntu2204/x86_64/cuda-keyring_1.1-1_all.deb
sudo dpkg -i cuda-keyring_1.1-1_all.deb
sudo apt-get update
sudo apt-get -y install cuda
Add CUDA to your environment variables in .bashrc:
export PATH=/usr/local/cuda/bin${PATH:+:${PATH}}
export LD_LIBRARY_PATH=/usr/local/cuda/lib64${LD_LIBRARY_PATH:+:${LD_LIBRARY_PATH}}
Reload environment and test:
source ~/.bashrc
nvcc -V
This should display the installed CUDA version.
Code Repository
To download the code, one can clone from the git repository using the command:
git clone https://github.com/ranjkunn/TBSBIEM.git
Code Structure
Once the repository is downloaded, get into the directory TBSBIEM, you will find the following directories:
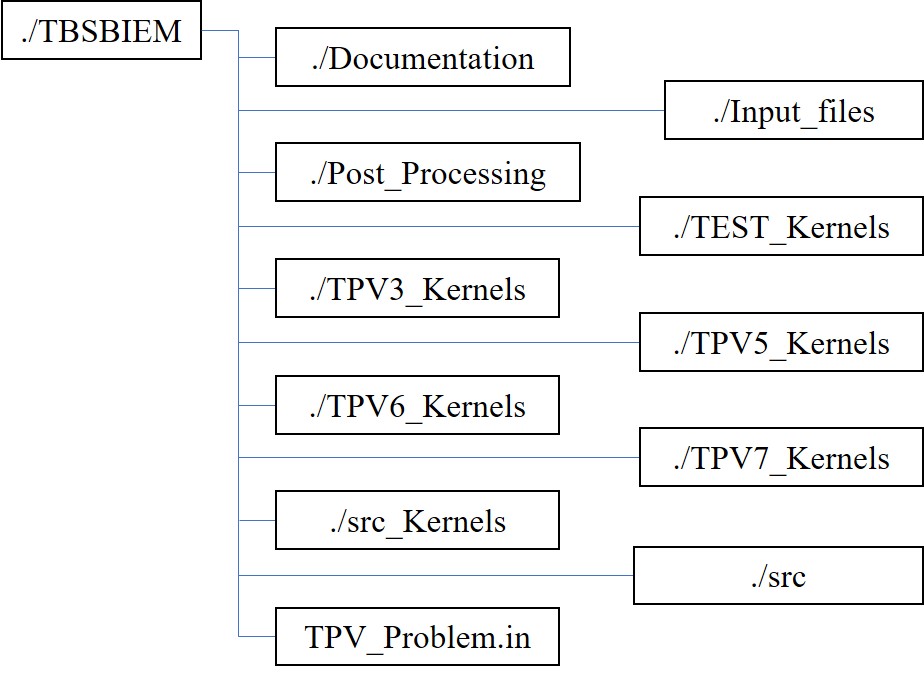
Fig. 1 File system tree for TBSBIEM package.
‘./Documentation’ stores the documentation source code.
‘./Input_files’ will have all the input files created.
‘./Post_Processing’ will have the Gnuplot script to generate plots.
‘./TEST_Kernels’ will have kernels pre-computed for the input file given in ‘./Input_files/TEST.in’
‘./TPV3_Kernels’ will have kernels pre-computed for the input file given in ‘./Input_files/TPV3.in’
‘./TPV5_Kernels’ will have kernels pre-computed for the input file given in ‘./Input_files/TPV5.in’
‘./TPV6_Kernels’ will have kernels pre-computed for the input file given in ‘./Input_files/TPV6.in’
‘./TPV7_Kernels’ will have kernels pre-computed for the input file given in ‘./Input_files/TPV7.in’
‘./src_Kernels’ will contain source files only for generating the Kernels.
‘./src’ will have the main source files of the code.
‘Test_Problem.in’ will have a target problem to be solved during the execution of the code.
Note: We have to create a directory ‘./data’ in which the output data of the solution is stored during the execution.
Building the docs
Before building the documentation locally, you need to have Python, Sphinx, and the sphinx_rtd_theme package installed on your system. Follow the commands given below to satisfy the prerequisites:
python -m pip install --upgrade pip
pip install sphinx sphinx_rtd_theme
To build the documentation locally, follow the commands below from the TBSBIEM folder:
cd Documentation
make html
The documentation will be built in the _build/html directory.
Code Compilation and Testing
You can compile TBSBIEM with the following commands:
cd TBSBIEM
cd src
make TEST=1
cd ..
./TBSBIEM-v1.1.0-TEST
Upon running the test, the USGS/SCEC benchmark TPV3 problem will be solved. The output data is stored in the directory ‘./data’. One can use the procedure given in the section ‘Post-Processing’, to plot the results.